FULL DESCRIPTION OF EDDY CURRENT INSPECTION (ECI)
Eddy Current Inspection (ECI) is an advanced electromagnetic nondestructive testing (NDT) method used to detect surface and near-surface defects in conductive materials such as aluminum, copper, steels, heat exchanger tubes, aircraft components, welds, fastener holes, and tubing systems.
It works on the principle of electromagnetic induction. When an alternating current is passed through a probe coil, it generates a changing magnetic field, which in turn induces circulating “eddy” currents in the test material. Any change—such as cracks, corrosion, material thinning, hardness variations, or conductivity differences—disturbs these eddy currents. This disturbance changes the probe coil’s impedance, which is displayed on the eddy current instrument as a signal indication.
Principle of Operation
-
The probe coil carries an AC signal → produces a magnetic field.
-
The field induces eddy currents in the surface of the conductive test material.
-
Eddy currents flow in closed loops directly beneath the probe.
-
Material discontinuities—cracks, pits, corrosion—alter:
-
current density
-
distribution
-
phase and amplitude
-
-
The eddy current instrument measures these changes and displays them as signals on:
-
impedance plane
-
strip chart
-
digital graph
-
2. Key Components of an Eddy Current System
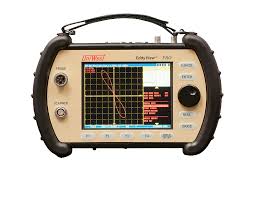
A. Eddy Current Instrument
-
Generates excitation frequency (100 Hz – 2 MHz)
-
Displays impedance signals
-
Supports single-frequency or multi-frequency modes
-
Includes filters, phase controls, gain, lift-off compensation
B. Probes
-
Absolute Probes – detect localized defects
-
Differential Probes – improve sensitivity, reduce noise
-
Encircling (bobbin) Coils – for tubes & rods
-
Surface Scanning Probes – for flat surfaces
-
Rotating Probes – high-speed scanning of turbine blades and aircraft holes
C. Calibration Standards
-
Conductivity blocks
-
Crack notches
-
Standard tubes (OD/ID defects)
Used to set phase / gain / frequency before inspection.
3. Inspection Capabilities
Eddy current inspection is highly effective for:
Surface Crack Detection
-
Fatigue cracks
-
Grinding cracks
-
Heat affected zone cracks
-
Weld toe cracks
Subsurface Defects (limited depth)
-
Up to ~6 mm depending on frequency & material conductivity
Corrosion Detection
-
Tube sheet corrosion
-
Condenser / heat exchanger tube thinning
-
Aircraft skin corrosion
Sorting and Material Identification
-
Alloy sorting
-
Hardness differences
-
Heat treatment verification
Coating Thickness Measurement
-
Paint
-
Anodizing
-
Metallic coatings
4. Advantages
-
Highly sensitive to small surface flaws
-
Immediate results (real-time)
-
No contact required (non-destructive)
-
Works through thin coatings
-
Suitable for automation & robotics
-
Excellent for high-speed scanning
5. Limitations
-
Only works on conductive materials (non-ferrous best)
-
Limited penetration depth
-
Surface condition affects results
-
Requires skilled technician for interpretation
6. Applications
-
Aerospace fastener hole inspection
-
Heat exchanger / condenser tube scanning
-
Power plant tubing (ET, ECT, RFT)
-
Aircraft structure corrosion mapping
-
Weld toe crack detection
-
Quality control in manufacturing
-
Material sorting (conductivity testing)


Reviews
There are no reviews yet.